Create your first Grok Bot and give it a job
Create a Bot from New chat, name it for its job, tell it that job in one message, then hand it a first task that needs no plugin or login. Real screens.
Last verified
On this page
To create a Bot, click New chat (the + at the top of the sidebar), type a name and click Create “name” Bot. Then tell the Bot its job in a message, which the Bot saves as its description.
You need three things.
#Create your Bot
A new Bot takes two clicks and a name. The walkthrough shows each screen, and ends on the panel where the app keeps everything about the Bot.
Create a Bot

1Click New chat
New chat is the + at the top of the sidebar, beside the search button. Click it and a To: field opens, with Create new Bot at the top of its list.
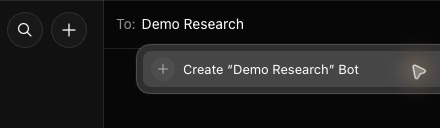
2Type a name, then click Create “name” Bot
Type a name that says the Bot's job, such as Meeting Prep or Expense Reports. The list shrinks to Create “name” Bot. Click that row.
The name steers the Bot: its first question to you often follows from it. Create new Bot skips the name and makes a Bot called New Bot, which you can rename later.
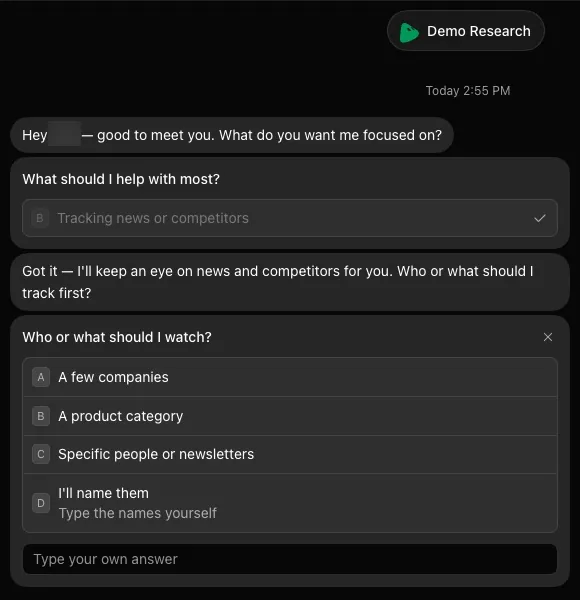
- An answered card folds down to your choice, with a tick.
- Click a lettered answer if one fits. The Bot replies, and often asks a follow-up.
- None fit? Use Type your own answer, or close the card with the x in its corner.
3Answer the Bot's first question, or skip it
The Bot speaks first. Working on it shows for five to ten seconds, then a greeting and a question card arrive. Answer the card if a choice fits. The next section sets the job in one message either way.
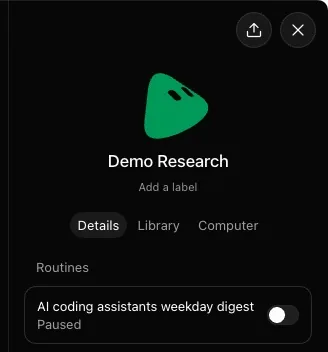
- Click the picture, the name or Add a label to change it. A label is a short tag that shows beside the Bot's name in the sidebar.
- Details lists the Bot's routines, each with a switch to pause it. A new Bot's list is empty.
- Library keeps the pages and files the Bot makes. Computer shows its screen.
4Open the Bot's details
Click the Bot's name at the top of the chat. A panel opens on the right with everything the app keeps about this Bot.
The picture opens an editor with three tabs: Bot for a shape and a color, Generate to describe a picture, and Upload for an image of your own, smaller than 25 MB.


#Tell the Bot its standing job
The details panel has no description box, and the app has no settings page for a Bot. You set a Bot's standing job by telling the Bot in chat.
A standing job holds what stays true every time: what the Bot works on, where it looks, what it hands back and when it asks you first. Here is one for a Bot that prepares you for meetings, with each part labeled.
Send your own version. The Bot saves it and repeats the saved text in its reply, which is the only place the app shows it. If the reply doesn't match what you sent, send the message again. Keep a copy, because you'll edit and resend it whenever the job changes.
The Bot builder writes this message for the job you pick.
#Hand the Bot a first task that needs no plugin
With the job saved, give the Bot something small to finish. Pick a task it can do from public web pages, so there's no app to connect first.
Copy this request and fill in a company you're about to talk to.
I have an intro call with [company] ([their website]) tomorrow. From their public website only, write one page of prep notes: what they sell, who it's for, pricing in one line, three recent items from their blog or changelog, and five questions I should ask. Save the notes as a file and share it here.Give it about a minute. Here is what came back when the company was Linear.
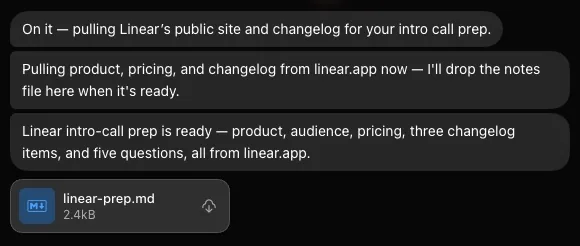
- Within seconds the Bot says what it's about to do.
- When it's done, one line says what's in the notes and where they came from.
- The notes arrive as a file. Click the card to read them in the app, where there's a Download file button.
The file is also kept under Library in the Bot's details. To change the notes, say what you want in your next message.
#Type, dictate or talk
You've typed everything so far. The message box has two more ways to reach a Bot, both at its right-hand end.

- The microphone is Start voice input. Your speech turns into text in the message box, and you can edit it before you send it. The shortcut is Cmd+D on a Mac, Ctrl+D on Windows and Linux.
- The waveform is Start voice chat, a live conversation. The Bot answers out loud and keeps listening until you hang up.
- The waveform shows only while the message box is empty. Once you type, the send arrow takes its place.
- When a voice chat ends, a Voice chat line with the call's length appears in the chat. Click it to read the transcript.
#Three mistakes with a first Bot
A first Bot that wanders or stalls usually comes down to one of these.
#Check you've got it
Your Bot has a job and has finished a task. One check on the difference between the two.
One line of this standing-job message doesn't belong in it. Tap it.
- Set your description to this:
- You watch what my three main competitors publish.
- Use their public websites and public news only.
- Summarize the article I pasted above in five bullets.That's today's request. Send it as its own message once the job is saved. The standing job holds only what stays true every time.
- Ask me before you contact anyone.
- Then show me the description exactly as saved.
Show the answer
Summarize the article I pasted above in five bullets. That's today's request. Send it as its own message once the job is saved. The standing job holds only what stays true every time.
Next, connect your Bot to an app you work in, so its job can reach past public web pages.
Can I create a Bot on my phone?
Yes. In the phone app, tap + on the home screen and choose New Bot.
- First published.
Get the Grok Bot cheat sheet
One page to keep open while you use Grok Bot. Sign up and download it straight away. New guides follow by email. Free.
Thank you! Your cheat sheet is ready. Download the PDF
Sources
9
- Cursor Help Center: Onboarding cursor.com
- Cursor Help Center: Change a Bot's name, picture, and description cursor.com
- SpaceXAI docs: Create and manage Bots docs.x.ai
- SpaceXAI docs: Get started docs.x.ai
- Cursor Help Center: Voice chat with a Bot cursor.com
- SpaceXAI docs: Grok Bot for Mobile docs.x.ai
- Cursor forum: staff on the description field in the desktop details pane forum.cursor.com
- Cursor forum: staff on Bot instructions on desktop forum.cursor.com
- Ben Lang on X: tips collected from the Grok Bot team x.com